

Here at Cindy's Confections we LOVE cool new sugar techniques. Last year we did this cake with teal butterflies on it which became the runaway favorite among the cake decorating crowd. We had so many requests of "How do you do that?" that we decided to go ahead and blog about how easy these butterflies are to do and spotlight the the gals who taught us this technique.
Diane Simmons and Michaelle Stidham are two amazing sugar artists from Michigan
This gave birth to two books, tons of veining sheets and a whole new era in cake decorating using new gelatin techniques. Enjoy!!

1. This is the veining sheet I bought from Diane Simmons at Cake Connection She’s the one who developed this technique with Michaelle Stidham. I apologize for my limited photographic skills, I don’t know how well you can see the butterflies on the sheet. Later in this tutorial I have taken a Sharpie and drew circles around the butterflies so you can see better.

2. This is what you need to get started: unflavored gelatin, airbrush color, a small bowl to mix the water and gelatin and a wide brush. The ratio is 3 TBSP unflavored gelatin to 7 TBSP water. Mix this together in a small bowl and let sit for a few minutes.

3. When the gelatin mixture has set up for a few minutes, it becomes solid. Put in the microwave for 5 -10 second intervals (for no more than 30 seconds) until it turns liquid. This liquid mixture will foam on top.

4. Skim the foam off the liquid gelatin mixture. Put ONE DROP of airbrush color in and stir. Now, you CAN use regular gel colors, but ONLY if they are watered down.

5. This is what one drop of color mixed in will look like. The key to beautiful gelatin creations is to not go too dark with the color (and it doesn’t take much to get too dark a color.)

6. The gelatin sheet has two sides to it, a side where the veining is up away from the sheet and the other side where it’s “into” the sheet. You want the side the veining is going “into” the sheet up so the gelatin will flow into the grooves. Take the liquid gelatin mixture and a wide brush and paint on in a thin, even layer. This will take some practice. Brush a little swish of gelatin connecting both wings on each butterfly. (This becomes important later.) Check to see you don’t have bubbles in the wings. Don’t be afraid to paint outside the lines, this is preferable as the wings are trimmed later. If you try to paint right to the wing edges, you will get thick wings that don’t look right.

7. It doesn’t take long for the gelatin mass to go back to a solid state. I put the nickel on top to demonstrate this. You can microwave the gelatin mixture repeatedly until you use it up. This won’t hurt it at all.
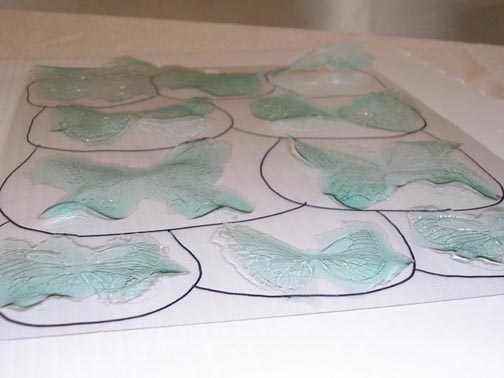
8. These butterflies take at least six hours to dry, but I prefer overnight. In the morning you will see them peeling themselves off the veining sheet.

9. Sometimes you hear a “popping” sound when they peel off. Don’t worry if they curl up, this can be fixed.

10. For the sake of the photo tutorial I outlined the dried butterflies with a sharpie so you can see better. See the two butterflies in the center? I accidentally painted them together. Don’t worry, they are cut apart with scissors. The one on the right I didn’t go quite to the edge of the wing, (you have to watch that. It’s easy to overlook.) The butterfly veining sheet has three different sizes on it.

11. Trim the wings with regular old scissors. On the top row I took a sharpie and put dotted lines between the wings – when you are cutting the butterflies, be sure to leave that area between the wings intact. The butterflies in the center I took and folded between my fingers and gave a little pinch to, that’s how they get their shape. The ones on the bottom I painted too thick and they cracked when I bent them. Getting the right consistency in painting the gelatin mixture on the sheets takes practice, so don’t worry if it doesn’t turn out. The single butterfly wings can still be used on a cake.

12. Take some piping gel and thin it with water. Use a flat brush to gently rub the edges of the butterflies with the piping gel. Use Disco Dust in a complimentary color and just dip the gel coated wings into the dust. Disco Dust is the only stuff that works – luster dust, pixie dust and some of these others on the market are too fine a granule and will only smear your wings and make life miserable. (Go ahead, ask me how I know that one!) Don’t worry about getting the dust on the entire wing, that can be brushed off with a stiff nylon bristled brush. Anyplace the piping gel touches the butterfly, the Disco Dust will stick to that, so be careful. I like the butterflies with just the edges trimmed in Disco Dust, I think they look better.

13. To put on a cake, just use a dot of royal icing. Here I piped royal icing bodies over the fold in the center. You can use stamens for antennae if you like (dip the end in piping gel, then in Disco Dust for an extra touch.) You can take an edible marker and draw over the veining for a more defined look.
And that's all there is to it!!
I love the great detail you provide. This is exactly the kind of thing newbies need with new techniques. I remember you telling me all about that cake, Cindy, and I still think it's beautiful!
ReplyDeleteWhat a great tutorial! I'm SO glad I found your blog!!
ReplyDeleteA fabulous tutorial...I'm envious as the books and sheets don't seem to have made it over to the UK yet!
ReplyDeleteThis was so clear and beautifully explained. Thank you!
ReplyDeleteBeautiful! Can these butterflies be stored? Like if I wanted to make a butterfly rainbow, how should I store the butterflies?
ReplyDeleteHi Malcom's Girl, Yes they can be stored! Keep them in an airtight/watertight container away from light and humidity and they will do great. I still have some of the first ones I ever made in my curio cabinet! :D
ReplyDeleteHan quedado hermosas !!!! Muy bien explicado .
ReplyDeleteLA TORTA ESTA MUY DELICADA .
Un beso , cuìdate , feliz inicio de semana .
Nancy
I like it so much, like real! Thanks.
ReplyDeleteHi, thanks for your wonderful post n tutorial but how to you fix curled wings? Please advise, thanks!
ReplyDeleteHi
ReplyDeleteCan these be attached to floral wire if so can you send me the how to
hola desde Ecuador te saludo ..una pregunta donde los puedo comprar en mi pais no creo que haya.te felicito te quedo hermoso soy principiante y espero hacerlo bien..
ReplyDeleteHow do you fix them if they curl?
ReplyDelete